Setup Angular With node and Angular CLI
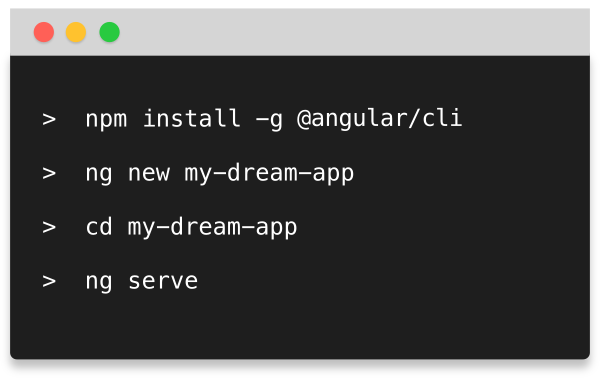
Let's build our first Angular app. For that, we'll use the official Angular Command Line Interface (CLI) and that is the recommended and best way of creating Angular projects because Angular projects are actually a bit more elaborate regarding their build workflow. There are a couple of files that need to be converted before they can run in the browser and the CLI does all of that and it also heavily optimizes our code so that we ship a highly-optimized code version to the browser, once we finally deploy our app. So, in the image below can see all the steps you need to run it and these steps are the same for Windows and Mac.
 Now, for them to work, you need one additional tool and that is NodeJS. NodeJS is a server-side language it will be used behind the scenes by the CLI to bundle and optimize our project and we will use NPM, the Node Package Manager, to manage the different dependencies an Angular project have. Dependencies are things like the Angular framework itself, but also some other libraries that framework uses. You can simply download the latest version of Node from here.

In this case it's version 10.11.0. Node installed is pretty straight forward. After installation, open command prompt on Windows or Terminal in Linux or Mac. In Windows you might need to open a privileged command prompt by right clicking on the executable and clicking Run as administrator to rule out some potential issues.
But in the end, you should be able to simply run

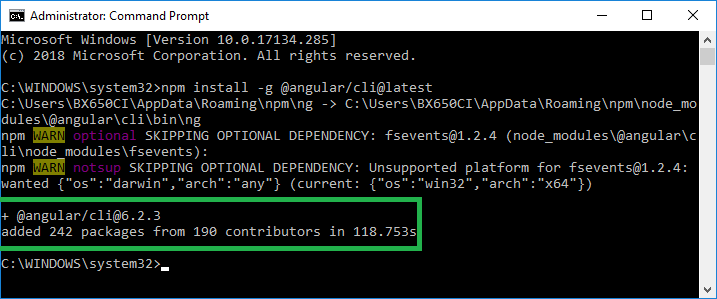
Node Package Manager Repository and install angular on your machine. You might get some warnings or may be error as long as you see something highlighted in the green box in above image you are good to go. Now we create our first project and we do this with this
Once creation of our project is finished successfully, we can navigate into that folder with the cd my-angular-app. In this folder execute

This is just a simple starting screen provided by the CLI project. Welcome to app with some useful links to the official docs. This is our first application.
 Now, for them to work, you need one additional tool and that is NodeJS. NodeJS is a server-side language it will be used behind the scenes by the CLI to bundle and optimize our project and we will use NPM, the Node Package Manager, to manage the different dependencies an Angular project have. Dependencies are things like the Angular framework itself, but also some other libraries that framework uses. You can simply download the latest version of Node from here.

In this case it's version 10.11.0. Node installed is pretty straight forward. After installation, open command prompt on Windows or Terminal in Linux or Mac. In Windows you might need to open a privileged command prompt by right clicking on the executable and clicking Run as administrator to rule out some potential issues.

But in the end, you should be able to simply run
npm install -g @angular/cli@latest
-g is used to install and make package available globally, @latest is optional, but @angular/cli is mandatory. On Mac or Linux, you probably need to add a sudo in front of this to give yourself the right permissions, if you do not already have.

Node Package Manager Repository and install angular on your machine. You might get some warnings or may be error as long as you see something highlighted in the green box in above image you are good to go. Now we create our first project and we do this with this
ng newcommand, which is now available since we installed the CLI. For that navigate into a folder where you want to create that project and once you navigated their, you can simply run
ng new my-angular-app
ng new is a set command to create a new project. Simply hit Enter and now this will create a new folder with a couple of files and dependencies and the entire build workflow setup in there. You might notice the setup a bit complex this is due to the fact that Angular uses Typescript; a super set of JavaScript. Typescript is basically a language that looks a bit like JavaScript and is compiled down to JavaScript in the end by that workflow, but which also offer some extra features. To do that, compilation, as well as a couple of other optimization steps, we need this complex setup with all these dependencies.

Once creation of our project is finished successfully, we can navigate into that folder with the cd my-angular-app. In this folder execute
ng serveng serve basically bring up a development server that will run your build so that you can see it in the browser. The server runs on localhost:4200 by default. Simply go to the browser, enter localhost:4200 and you should see something like the image below.

This is just a simple starting screen provided by the CLI project. Welcome to app with some useful links to the official docs. This is our first application.
Click to Load Comments


